Login


Proofing Dashboard & Managing Proofs

Proofing Dashboard included Free Feature

Proofing Dashboard Navigation

Proof Management included Free Feature

Manage and monitor your proofs inside the Dashboard

Proofing Dashboard 

included Free Feature - This feature comes as standard with WeAproove+ Free Account

When you log in to WeAproove+, the Proofing Dashboard is your central repository where you create, version, monitor, and manage your proofs.

See the "Managing Proofs" tab for details on proof management.

Proofing Dashboard Functions:
Below is a screenshot of the proofing dashboard along with a description of each function/button. 

Dashboard_Functions

1. Logo
The WeAproove+ logo is displayed in the top left corner. 
If you wish to add your company logo (which will also get applied to any email notifications) you can activate the "custom logo" feature in the "Get more options" tab (see below).

2. Select Proofs
If you click on "Select Proofs," a tick box will appear beside each proof. Select the proofs you want to select. 

3. Trash Can
The trash can icon is suppressed by default to avoid accidental deletions. When you start selecting proofs, the trash can will become active, allowing you to delete any proofs you no longer require. 

4. My Contacts
"My Contacts" is your personal address book. When you create a proof, the contacts area will automatically open, allowing you to add reviewers to your proof. If you add a reviewer that is not part of your contact book, they will automatically get added to your contacts. By clicking on "My Contacts" in the dashboard menu, you can manually add, edit, or delete contacts. See the short video below. 


5. Storage Allocation
The slider bar gives you a visual representation of how much storage you have left in your allocation. The green storage number is how much storage space you are using vs. the black figure, which displays your total storage allocation. The displayed figures will automatically adjust as you add or remove proofs or add or remove any storage to your account.  

6. Unlock Account / Get More Options
When you are on the FREE edition of WeAproove+, "Unlock Account" will be displayed in the proofing dashboard. When you select "Unlock Account," you will be taken to the purchasing area of WeAproove+.

The purchasing area displays all the options available for you to purchase. The minimum first purchase has to be the "unlock base features" option, which will give you 10Gb Storage, Unlimited Proofs, Versions & Guests. Only once "unlock base features is selected are the additional options available for purchase.

Select the options you require and hit "Purchase" to get taken to the payment page. Once you have input your payment details and the transaction is complete, you will get taken back to the main dashboard and, the unlocked base features plus any other options you purchased will become available. 

Now you have unlocked the base features the "Unlock my account" menu in the dashboard will now display as "Get more options." By clicking on the "Get more options" button, you will be taken back to the options page to see a summary of what you have already purchased. If you wish to add more storage, users, or features to your account, select the options, and hit purchase. The transaction will automatically be pro-rata and added to your monthly billing. 
See the short video below.

Please note;

  • If you add features, those features will not be available on proofs already in the system (because you were not paying for those features at the time of proof creation). 

  • If you wish to cancel a feature from your subscription, you can do this after a minimum one month period and refunds are not available.


7. Settings
The settings area is where you manage your account. The user who created the WeAproove+ account by default becomes the subscription manager. If you add additional users to your account, they will only see the "My Account" tab unless you grant them "admin" permissions from the "My Users" tab. 

My account
The My Account tab displays your avatar, email address, default language, and the subscription account you are assigned to. If you click the pencil icon, you can edit your details, change your password or delete your account. 

My Subscription
The "My Subscription" area is where you see your company name along with details of your last payment (if you have unlocked the FREE account) and your next payment due date. If you have unlocked the custom logo option, this is also the area where you upload your company logo, which will be displayed in the WeAproove+ interface and on any outgoing emails. 

If you click on the pencil icon, you can amend your company name or suspend your subscription. If you suspend your subscription, a warning will appear. The warning will tell you your subscription "end date" and advise you that we will keep your account and data for 30 days, if the account is not re-activated within 30 days all your data will get erased. 

My Options
Summary area displaying the active options on your account along with the monthly price and the date the option got added. You also have a quick link button to add more features if required.

My Storage
A visual display of storage used vs. storage available. You also have a quick link button to add more storage if required.

My Users
Two visual displays;

  • Usage users chart - displays the number of activated accounts vs. amount of available accounts.

  • Purchase users chart - displays the free user included in WeAproove+ and how many additional users have been purchased.

Below is a list of the assigned user accounts and what date the user got added. If you wish for the user to be an Admin in the system, you can tick the Admin button (located next to each name) to grant admin permissions. 

If you have a spare account, you can add a user with the + button, which will send them an email notification requesting them to join your team. 

WeAproove+ also has the concept of a "Guest" account. A guest user is someone you add to the proof review, but they are not part of your team inside WeAproove+. A guest user has no login and password into WeAproove+, and each time you invite them into a proof review, they will receive an individual email link asking them to review the proof.

8. Logout
Click here to logout of your WeAproove+ account.

Proof Management 

included Free Feature - This feature comes as standard with WeAproove+ Free AccountFinancia

Creating, managing, and monitoring your proofs inside WeAproove+ is simple!

Create a Proof for Review:
To create a proofing review cycle, you can navigate to the proof you wish to review or drag and drop your file directly into the application. 

Once the proof has been uploaded and processed, you will see a preview of your proof, and the "Invite contacts to annotate" window will display.

As you start typing, any matching entries from your contacts will appear in a smart list, allowing you to add reviewers quickly. If you add a reviewer that is not in your contact list, you can click on "new contact" once you have typed out the email address, and they will get added to your contacts for future use.

By default, a pre-written message sent to your reviewers is displayed, but you can overtype this with your own custom message. This message gets displayed in the email notification that your reviewer receives along with the link to the proof.


Managing Proofs:
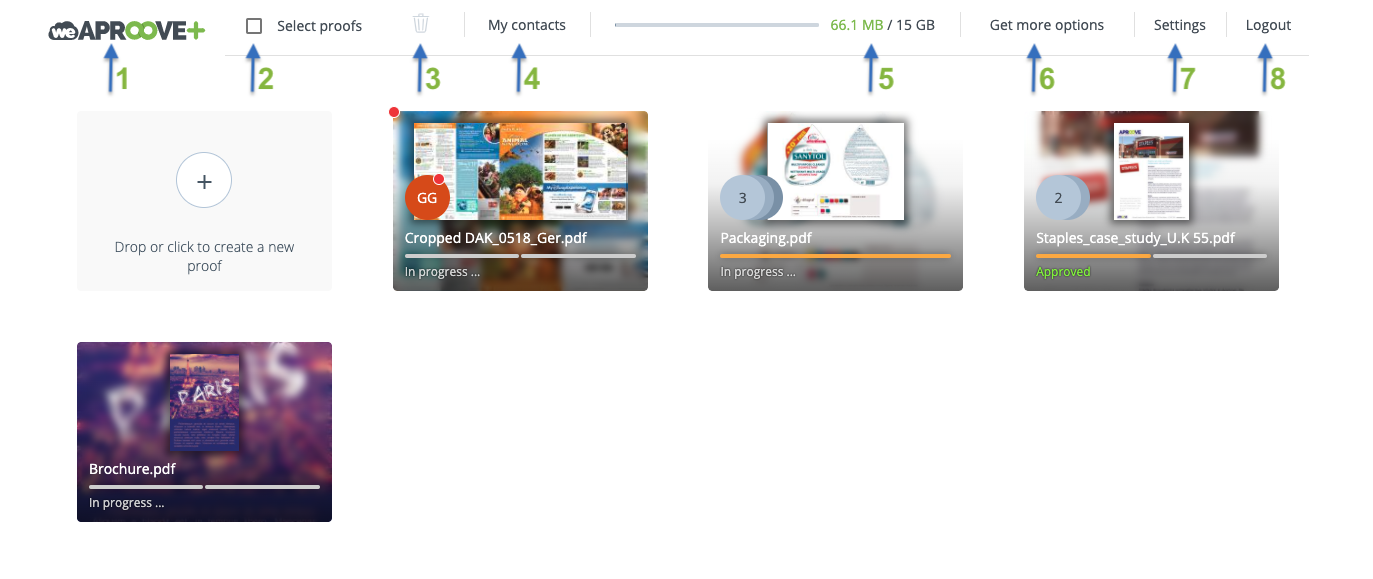
Each proof created is displayed inside the proof dashboard. If you click on any proof, the window will extend and reveal more information and functions related to the selected proof. See below for a description of each function;

Manage Proof1

1. Thumbnail
The proof thumbnail gets displayed for quick identification. The thumbnail is always the first page if you upload a multipage proof or first frame of a video.

2. Proof information
The proof name, size and last saved date of the proof is displayed

3. Number of reviewers
This number only displays when the window is not fully opened and gives a quick reference to the number of reviewers invited into the proof. Further details of the reviewers get revealed when you expand the proof view by clicking on it.

4. Proof Status
The Proof Status displays the current status of the proof, such as "In Progress, Approved, or Rejected," etc.

5. Lock Proof
If you lock the proof, your reviewers cannot review or annotate your proof until you unlock it. This is useful if you wish to pause a review without deleting the proof. 

6. Approve/Reject Proof
By clicking on the Approve or Reject button, you will set the decision for the proof. Approval will complete the review cycle, and rejection will require a new proof or version to be uploaded. 

7. Add Reviewer
This allows you to add additional reviewers into the proof even after you have set up the proof project.

8. Reviewers avatar and proof status
Any reviewers added to the proof will have an avatar with their initials displayed. If you hover above any avatar, the full email address of the reviewer will display.  A small cross will also appear, which you can use to remove the reviewer from the proof should you desire. 

Under each reviewer's avatar, you will see their proof status, eg. "Pending, In Progress, Done." This updates in real-time as your reviewers work on the proof giving you instant updates of proof progression from within the dashboard. The proof owner will also be notified via email as the reviewers start working on a proof and when the review is complete. 

If the reviewer adds any notes or annotations to the proof, you can click on the note indicator under the reviewers' avatar. A pop-up window at the bottom of the screen will report the reviewers' proof activity.

See short video demonstration below;


9. Add Version: (Unlock base feature)

If you have unlocked the base version, you can create proof versions. Creating versions allows you to store the entire proof history in one location and visually look at older proofs inside the review interface. 

As soon as a new version is uploaded, your older version/s are automatically locked, and the reviewers will no longer be able annotate or add notes to the older version/s. This ensures your reviewers are always collaborating on the latest proof. 

To add a proof version, click on the +Add Version button and navigate to the proof you wish to upload as the new version. Once the file is processed, add your reviewers. 

The Proof version number gets displayed under the proof in the dashboard. 

You and your reviewers can also view the older proofs inside the proof review window. See short video demonstration of adding and reviewing a proof version below.

HOT TIP
Adding the comparison tools to your WeAproove+ account enhances the versioning feature to new levels allowing your reviewers to compare old and new proof versions using four different comparison modes!


10. Progression Bars

If you have a multi-page document, this bar represents each page. As reviewers complete the review process or a decision gets made on the proof, the progression bars will change color according to the page status, e.g., approved (green), rejected (red), etc.

11. Open Proof
If you click on the proof thumbnail, you have the option to open the proof. If you open the proof, you get taken into the review interface. From here, you can see any notes, comments, and annotations made by your reviewers, and you can add your own. If a reviewer is online at the same time as you, any activity will display in real-time.

Learn about features inside the review interface by clicking the links below;